

In my last Anatomy of a Blogpost, I took you through selecting the outfit, starting from the skin and focusing on promotional items I've gotten through various sources. Now I want to take you through how I take my pictures - which is fairly different from most of what I see on the feeds. You can assume all the steps in the last post took place, just offscreen.
Next, I go to my blog and the various links I list along the side (yes, those are primarily for ME!). I have a section labeled "Locations and Events" and that is where I tend to start when looking for a locale to photograph in. My raison de blog is to combine looks and locations, and the second half is as vital as the first - a bad location can sink a photoshoot. Usually by this time I have a sense of the outfit and the feel I want to extent; sometimes this can be very specific which causes a problem (I have a real problem finding well-made futuristic cityscapes, for example). Often it's a look and feel I can achieve through posing and windlight settings, though, which makes my life a lot easier. In this case, I found a good spot through Honour's Post Menopausal View, but if I'm stymied at that point I'll go for the Destination Guide, and if that fails me I'll go to regular searches (a process impeded by the fact my webkit plugin refuses to work, and Second Life runs it's in browser search through... the web) and just hop around until I find what I want or give up - whichever comes first.
Having found Chouchou as my photoshoot local, I go and let things rez. I'm often working with things in the background, so I might even walk around a bit to make things come into focus. While I'm waiting for things to rez, I pull together my "fashion" notecard - which is my way of tracking everything I'm wearing so I can list it all, and also my way of tracking which poses I'm using in a given picture. I'm also setting up my poseHUD, my eye and expressions HUD, and getting the lay of the land to figure out where I might want to settle myself for different types of pictures. For each photoshoot I try to plan one extreme closeup, one shoe shot, one shot form behind, one torso shot, and one full length shot, plus one wildcard of something which ends up appealing to me at the time. I usually take six pictures total, though now and then I'll take more and when trying to photograph an entire exhibit I ended up taking over thirty (that one sucked to track!). While I'm setting up I'm usually dealing with lag and sometimes dealing with difficulties from people around me, often dealing with group chats and the odd stranger IMing me to make conversation or ask for sex.Once I'm set up, as you can see below, my screen is somewhat constrained; the ANYPOSE facial HUD can be shrunk, but the PoseAnywhere HUD and Notecard I keep open the entire time.
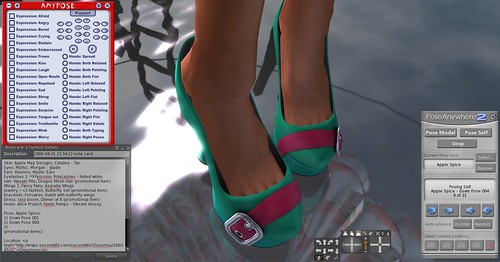
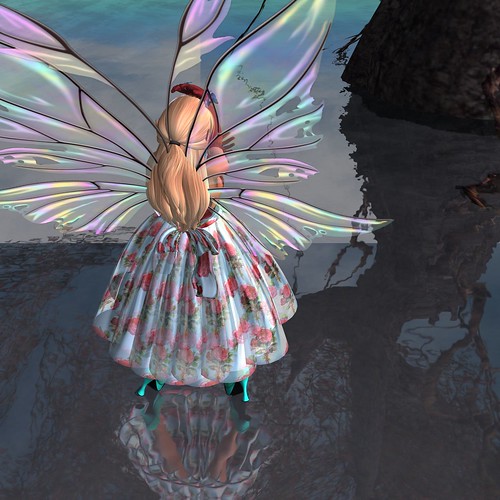
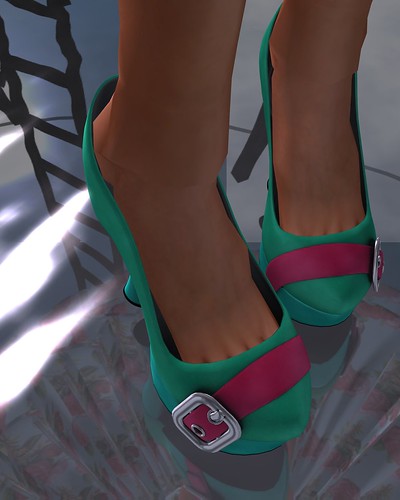
Having selected my first photography spot, I get into position and alt-click to focus my camera on myself. Once I'm settled, I start looking for a pose that will show off the outfit, my shape, and the background each to the best effect. For body poses, I'm looking for large and dramatic poses. For pictures from the back, I'm looking for something makes my back and details on what I'm wearing look good. For shoe pictures, I'm looking for an interesting combination of feet which aren't too far apart. I'm also tracking the background, what is of interest in it, what looks odd, what flatters the total picture and what doesn't look as good. I'm fond of movement in the background, so I'll often sit in a pose and wait a while for a look which really appeals to me - included repeated refreshes. In terms of the "final" version of the shoe pose above, I waited for the lighting of the waves to be interesting before I refreshed, thus capturing a set of three as you can see below. Obviously, I couldn't replicate that for the HUD picture I took above - I didn't even try - but you can see the difference in the look (and the cropping, which comes later) given on my waiting for the right moment.
Once I have the final pose, I angle myself to a view I like using the camera controller (you can also see it open on the pictures of my interface above). Sometimes I click something in the back, which resets my camera, and much cursing happens. Sometimes I'm lagging, and the camera controls are clumsy and difficult to get nuance through. In a more popular place, I might find people in the background or sitting on things I want to pose by (in this case, there was a woman sitting on the cage I took a picture by, and I ended up cropping someone else out of the background of that same picture). Once I'm set on Pose and Camera Angle, it's time to play the spot-the-error-game; I look for places where things aren't rezzed, places where shoulder ruffles cut through my arm, even where the angle on a wing looks odd. If possible, I edit and move the offending item (in one recent photoshoot, the entire torso prim of the dress is off my body by quite a lot, but because of the angle of the shot you can't tell and it corrected for a rather serious case of ruffle-through-the-shoulder); occasionally, if it's in the case of a sculpty not rezzing, I end up relogging to reset things. I set my eyes to either look at the viewer or off-camera somewhere. If hands look awkward, I'll use the ANYPOSE HUD to make them relaxed, or pointing, or fisted. Once I'm sure I've caught as much as I can, I rebake my textures (it makes a difference, seriously) and take the shot.
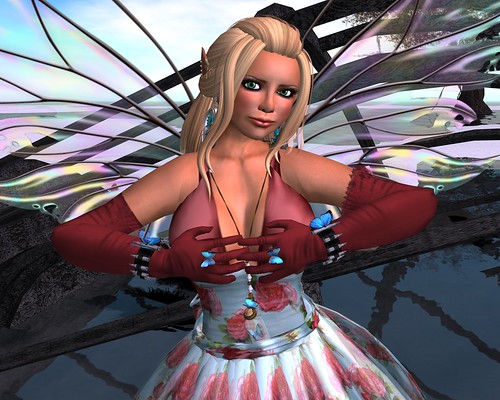
You've gotten some close ups of the wonderful outfit I pulled together for this I Can Haz Promoshunz, let me wax a little rhapsodical as well. The hair is from one of my favorite hair creators, Wasabi Pills, and is part of her growing collection of rigged, mesh hair. I love these as long hair, and have to admit I'd find it difficult to pose with long hair which isn't rigged; it broadens out the use of poses so much when you don't have to constantly worry about placement of prims with long hair. As you can see between pictures, the hair looks like it's falling smoothly no matter how far my head is turned. The jewelry is a combination of I & 3 Fashion and Forsaken. The earrings are a slightly different shade of cyan, but I completely adore the matching rings and the butterfly-bottle necklace from I & 3 Fashion. The Bullet and Butterfly bracelets from Forsaken are something I love to pull out for a bit of an edge in my otherwise innocuous outfits - it's not obviously violent, but just slightly suggestive of the BFG I keep under my skirts.
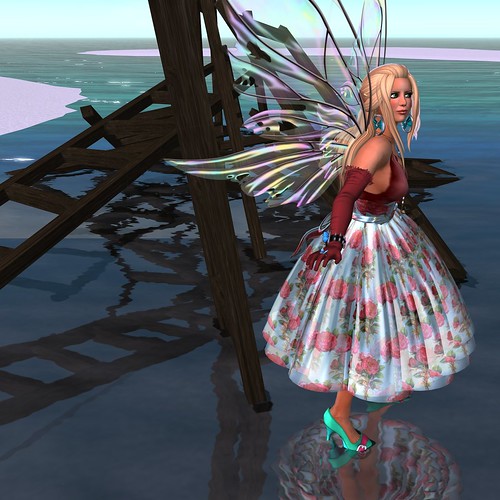
The eyes are gorgeous ones from Mythic - I went green but they're available in a ton of different colors, from clear and bright to natural. I paired it with a newish skin from Apple May Designs in tan; I really like the slightly darker tone with blond hair and bright green eyes. The lips on Catalina are really fantastic, as is the brow line, and I'm showing it here without any addition of cosmetics - this is the skin out of the box, so to speak. It comes with a set of eyelashes included that I'm not showing here, and in shades from vampiric pale to a caramelly brown. The dress is a fantastic one from siss boom that I have completely fell in love with. The skirt is very well textured - layered so that the translucent on top doesn't have alpha occlusions through the legs. The bodice line is a halter top that is really well placed, and the tone-line between the rich burgundy and the teal with pink roses is perfectly done. Gloves come with it and they have a ruffly top edge which I think really finish them off beautifully. From behind, there is a classy curve of a bow on a belt which offers some shape around the waistline. The second I put this dress on I knew I needed to blog it, and I also knew how hard it would be to find shoes to match. I finally settled on the tintable shoes from Alice Project, pairing cyan and pink to round it out in the end. I've talked up these shoes many times on this blog, and I continue to highly recommend them - both for the ability to tint them and the fact they come with five different heel choices, which really make them a valuable investment.

( More pictures here. )
Credits:
Skin: Apple May Designs, Catalina - Tan
Eyes: Mythic, Morgan - glade
Ears: Illusions, Mystic Ears
Eyelashes 2: *X*plosion, PrimLashes - tinted white
Hair: Wasabi Pills, Dragon Mesh Hair (promotional item)
Wings 1: Fancy Fairy, Azarelle Wings
Jewelry: I <3 Fashion, Butterfly Set (promotional item)
Bracelets: Forsaken, Bullet with butterfly wings
Dress: siss boom, Dinner at 8 (promotional item)
Heels: Alice Project, Faelin Pumps - Vibrant Glossy
Poses: Apple Spice (promotional items)
Location: Chouchou
Light Settings: TOR, MIDDAY Cheery cyan
Water Settings: Glassy
Photographed by Deoridhe Quandry
Post processing: Cropping only
No comments:
Post a Comment